REVIEW · MEXICO CITY
From Mexico City: 2-Day Pico de Orizaba Summit Trek
Book on GetYourGuide →Operated by Travesías México · Bookable on GetYourGuide
Mexico’s glacier sunrise is a different kind of sunrise. On this Pico de Orizaba trek, you get panoramic high-altitude views and a summit push with experienced guides who keep you comfortable and moving safely. The only real catch is the altitude: you need excellent fitness, and you should take acclimatization seriously.
You’ll start with a drive to the mountain hut near Piedra Grande and a hands-on acclimatization walk that includes crampons and an ice axe. With a small group (up to 15) and English/Spanish guides, it’s built for real mountain technique—not just sightseeing. Just know this is not for people with heart or back issues, or for anyone who’s pregnant.
In This Review
- Key things I’d watch for
- Why Pico de Orizaba in Two Days Is a Big Deal
- From Mexico City to Tlachichuca: the Road That Sets the Tone
- Piedra Grande Hut Day 1: Acclimatization That Actually Matters
- Summit Morning: Timing the Sunrise on the Glacier
- Guides, Safety Gear, and What Small-Group Pacing Feels Like
- What You’ll Do After the Summit (and Why That’s Part of the Adventure)
- Price and Value: What $599 Covers (and Why That’s Not Just a Number)
- What to Pack for Cold, High Altitude (No Guesswork Needed)
- Fitness, Experience, and Who Should Skip This Trek
- Small Details That Make the Difference on a Real Summit Day
- Should You Book This Pico de Orizaba Summit Trek?
- FAQ
- What meals are included in the 2-day trek?
- Is gear like crampons and an ice axe provided?
- Where do we meet in Mexico City?
- How long is the trek?
- What should I bring for the summit trek?
- Do I need previous mountaineering experience?
- Is this trip suitable for everyone?
Key things I’d watch for

- The 5,700 m summit: highest peak in Mexico, and a serious altitude challenge even when the trek feels short on paper
- Sunrise on Mexico’s biggest glacier: you time your summit effort for the glacier glow, not a random stop
- Real cold-weather tools included: head lamp, helmet, crampons, and an ice axe mean you can focus on technique
- Acclimatization practice at Piedra Grande: you learn footing basics before you’re standing near the top
- Small group pacing: limited to 15, so you’re less likely to get swept along
Why Pico de Orizaba in Two Days Is a Big Deal

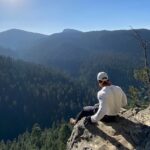
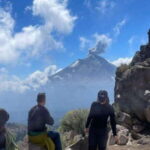
Pico de Orizaba is the highest point in Mexico at 5,700 meters, and it’s also the third-highest peak in North America. That mix—big elevation plus serious winter-like terrain—means the trek is short, but not easy.
The upside is the payoff. You’re not spending days hiking through generic scenery. You’re aiming for a glacier sunrise, then climbing into thin air where the views feel huge and the air feels sharp.
The other truth: this trek is technical and altitude-focused. You’re expected to be in excellent physical condition, and the tour notes that previous mountaineering experience is recommended. If you’re new to crampons or an ice axe, the pre-summit practice helps, but you still need to take the training part seriously.
You can also read our reviews of more city tours in Mexico City


From Mexico City to Tlachichuca: the Road That Sets the Tone
Most summit trips start with a long travel day. This one does too, but it’s designed to move you toward the mountain fast and efficiently.
You meet at a clear spot in Mexico City—at the corner of Vicente Suarez and Michoacan, by the benches in front of the market. Then you depart for Tlachichuca, Puebla, where the real mountain logistics start.
From Tlachichuca, you use 4×4 transport to reach the mountain hut in Piedra Grande. That part matters more than it sounds. The easier the ride is, the more energy you have for acclimatization and for learning your footing basics before you ever see the summit route.
Piedra Grande Hut Day 1: Acclimatization That Actually Matters
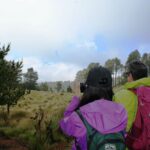
Day one is about getting your body ready and your gear under control. You arrive at the hut at Piedra Grande and start with an acclimatization walk—a short, purposeful effort to help your system adjust.
Then comes the skill part: you practice using crampons and an ice axe. This is one of the most valuable pieces of the whole experience because it’s not just equipment handed to you. It’s technique, and technique is what keeps you steady when the surface gets slick and your breathing gets harder.
Dinner at the hut comes after the practice. You then prep for the next day and go for a good night’s sleep. One night of lodging is included, and it’s simple mountain-style accommodation. The key is that the hut puts you close enough to start the summit climb at the right early hour without adding extra travel stress.
Also, meals are covered on day one: lunch and dinner. After spending time in cold air and at altitude, that’s not a small detail. It means you can stay focused on climbing instead of searching for food.
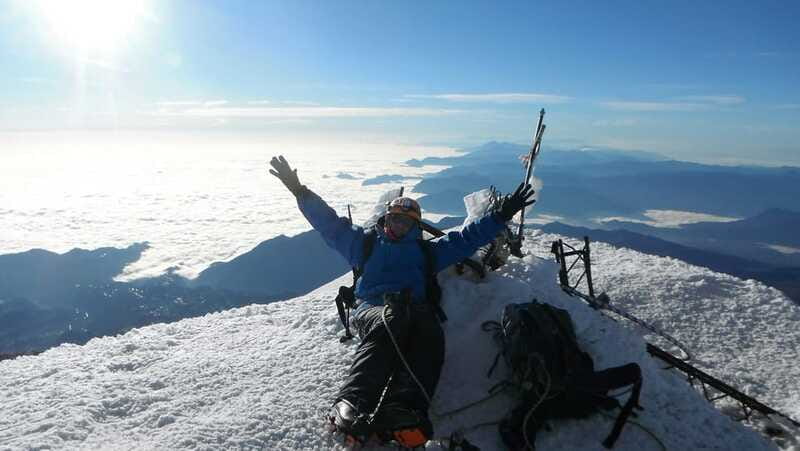
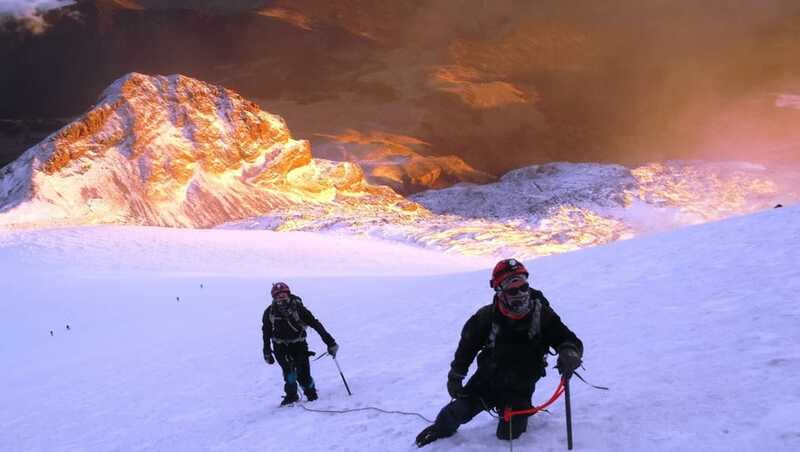
Summit Morning: Timing the Sunrise on the Glacier
You’ll start the second day bright and early—before dawn. This is not the kind of itinerary where you roll out slowly and hope for good light.
By the time the sun rises, you’ll be positioned to watch the valleys around Pico de Orizaba wake up. Then the glacier becomes the main event: you’ll see the first rays glint off the big glacier that leads to the crater.
From there, you follow the glacier toward the summit. The climb to the top is where the “two days” timeline starts to feel real. The elevation is the limiter: your body works harder, and your pace needs to stay steady.
Reaching the summit at 5,700 meters is the goal. And when you’re up there, the experience shifts from effort to perspective: you’re not just “on a mountain,” you’re at the top of Mexico with a panorama that comes from altitude, not from effort spent elsewhere.
After enjoying the views, you descend back to the hut where your transport to Tlachichuca is waiting. The climb is followed by recovery, and you get breakfast and lunch on day two to help you reset before the ride back.
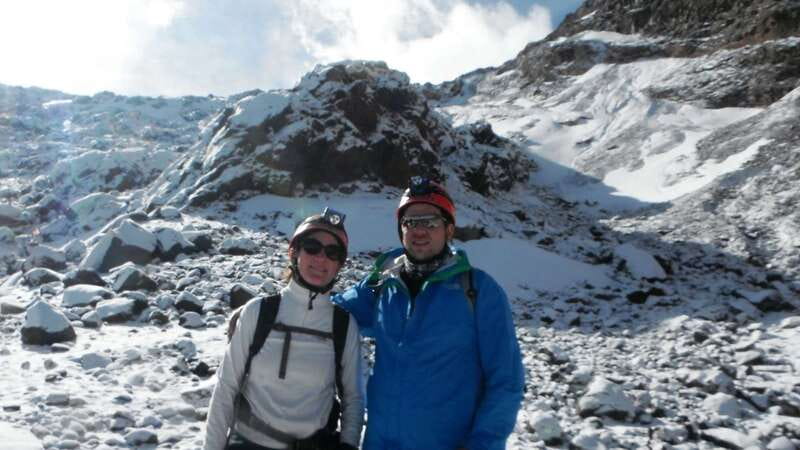
Guides, Safety Gear, and What Small-Group Pacing Feels Like
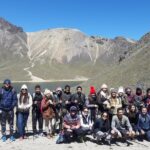
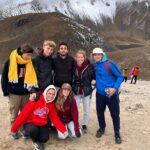
I like small groups on big climbs. Up on a high mountain, you want room for slower walkers, quick check-ins, and real attention—not a crowd moving at one speed.
This trip caps group size at 15 participants, and it’s run with qualified guides. The tour emphasizes safety equipment and includes the basics you’d want for glacier terrain: helmet, crampons, ice axe, head lamp, plus safety equipment and accident insurance.
That combination is practical. If you’re nervous about cold-gear handling, you’re not stuck figuring it out alone. If you’re experienced, you still appreciate having consistent tools and a plan.
You’ll also have a real live guide in English or Spanish. Clear instruction matters on snow and ice. People praised guides for being patient and supportive, including named guides like Bernardino, Alan, and Carlos. That type of coaching shows up in the way you’re allowed to move at your pace and in how technique is explained.
A small-but-important note from the experience style here: you’re not just handed gear and told good luck. The day one practice is part of the safety system, not a warm-up afterthought.
You can also read our reviews of more hiking tours in Mexico City
What You’ll Do After the Summit (and Why That’s Part of the Adventure)

The descent is often where people feel relief—and also where they can get sloppy. The good news is your day is structured so you descend back to the hut, not into chaos.
Once you’re down, transport back to Tlachichuca is arranged so you don’t burn energy searching for the next step. You then eat a restorative meal before returning to Mexico City.
That “finish with food and a plan” matters. It helps you avoid the common post-summit crash where you’re hungry, cold, and unsure what comes next. Here, you’re guided through the full arc: climb, descend, recover, ride home.
And you’re not carrying the full burden forever. The tour also notes that you can take things to leave in the hut and change afterward, so you don’t need to treat every outfit like luggage.
Price and Value: What $599 Covers (and Why That’s Not Just a Number)
At $599 per person for a 2-day summit trek, you’re paying for more than a route. You’re paying for altitude logistics, guided glacier technique, and a bundle of included gear and services.
Here’s what’s included:
- Guides and accident insurance
- Transport from Mexico City to Tlachichuca and onward by 4×4
- One night accommodation
- Meals: lunch/dinner on day one, breakfast/lunch on day two
- Safety equipment: helmet, head lamp, crampons, ice axe
- Entrance fees
This matters for value because you’re not just buying a ticket to a mountain. You’re buying risk management and preparation. If you had to source crampons, an ice axe, helmets, and guided instruction on your own, the cost quickly stops feeling like a bargain and starts feeling like a DIY gamble.
The only explicit thing not included is alcoholic drinks. That’s typical for high-altitude tours, and it’s also smart. When you’re dealing with cold and elevation, “hangover tourism” is not the move.
What to Pack for Cold, High Altitude (No Guesswork Needed)
The tour gives you a clear packing list. Follow it. On an ice-and-glacier day, the wrong clothing is more than uncomfortable—it can ruin your stamina.
Bring:
- Towel
- Sleeping bag (needed since you’re staying in the hut)
- Sunscreen and sunglasses (snow glare is real)
- Hiking shoes
- Thermal clothing + warm clothing
- Hat and gloves
- Daypack
- Toiletries and a change of clothes
- Rain gear
A smart approach is to pack for two climates: cold at night and cold during the early summit push. If you’re the type who underpacks, this is the trip where you’ll regret it fast. If you overpack, you can still keep your load manageable with a daypack and by stowing extra items at the hut.
Also remember: some cold gear is included (like crampons and ice axe), but clothing is on you. Plan on layers you can add/remove without fighting your system.
Fitness, Experience, and Who Should Skip This Trek
This trek demands serious commitment. The tour notes you must be in excellent physical condition, and it recommends previous mountaineering experience.
It’s also marked as not suitable for:
- Pregnant women
- People with haemophilia
- People with heart problems
- People with back problems
That’s not bureaucracy. At altitude, even small risk factors become big ones. If you’re unsure, you should talk with your doctor before you plan any high-altitude glacier climb.
For the right fit, this is a great choice if you:
- Want a real summit experience and not just a hike
- Are willing to learn technique (especially if you’ve never used crampons)
- Prefer a tightly run group with safety gear and instruction
- Can handle early mornings and cold conditions without complaining every 20 minutes
For the wrong fit, it’s a grind. If you’re looking for a relaxed nature walk, you’ll feel cheated. If you dread technical gear practice or you can’t handle altitude pressure on your breathing, look for a lower-elevation trek instead.
Small Details That Make the Difference on a Real Summit Day
The best summit trips run on boring details that prevent chaos.
A few things to appreciate here:
- Head lamp included, so you can start early without scrambling for batteries in a new place
- Helmet included, so you’re ready for glacier terrain where slips matter
- Crampons and ice axe included, so the day one practice can actually happen with the right tools
- Dinner and meals handled, so you can focus on recovery and warmth rather than hunting food
You’ll also feel the benefit of having a guide who stays attentive to comfort. People described guides as supportive, patient, and safety-focused—exactly what you want when the climb gets steep and breathing gets short.
Should You Book This Pico de Orizaba Summit Trek?
Book it if you want a serious, guided summit climb with real training time, clear safety support, and the kind of sunrise that sticks in your memory because it’s on a glacier, not behind clouds.
Don’t book it if you’re dealing with any of the tour’s stated medical limitations, or if you know you’re not ready to work at high altitude. Two days can feel short, but 5,700 meters does not care about your timetable.
If you do book, be honest with yourself about fitness and gear comfort. Show up ready to practice crampons, listen closely during instruction, and treat acclimatization like part of the climb—not a warm-up before the real work. That mindset is what turns a hard summit attempt into a safe, rewarding one.
FAQ
What meals are included in the 2-day trek?
Lunch and dinner are included on the first day. Breakfast and lunch are included on the second day.
Is gear like crampons and an ice axe provided?
Yes. The tour includes safety equipment such as a helmet, head lamp, crampons, and an ice axe.
Where do we meet in Mexico City?
Meet at the corner of Vicente Suarez and Michoacan at the benches in front of the market.
How long is the trek?
The experience is 2 days.
What should I bring for the summit trek?
You’ll want a sleeping bag, towel, hiking shoes, thermal and warm clothing, hat, gloves, sunglasses, sunscreen, rain gear, a daypack, toiletries, and a change of clothes. The list also includes other cold-weather basics like layers.
Do I need previous mountaineering experience?
The tour says it requires you to be in excellent physical condition and it recommends having previous mountaineering experience.
Is this trip suitable for everyone?
No. It is not suitable for pregnant women, people with haemophilia, people with heart problems, or people with back problems.
If you want, tell me your current experience level (any snow/ice hiking, altitude experience, and typical weekly fitness) and I’ll help you sanity-check whether this trek is the right difficulty for you.